29 Jun Maker’s Monday: Scabbards
Good morning everyone! Happy maker’s Monday! I hope you all enjoyed the nice guest post we had last Monday, and that you’re ready to have my ramblings back this week. Today we’re going to be talking scabbards! For most standard swords it’s a pretty simple process to go about making a scabbard out of craft foam but unfortunately, bobo the fool (me) decided to give one of his PCs some non standard blades. Which means non standard scabbards. So let’s talk through the process!
Supplies are the usual suspects: 2mm craft foam, something sharp to cut with, acrylic paint, contact cement, velcro, & eventually some modge podge to seal it in.
Now usually when I’m making a scabbard it’s a one piece deal. I cut a large trapezoid and fold it around the sword I’m giving a home to. It’s a pretty simple process, and it makes it easy to incorporate stuff like fabric or paint depending on how you want to cover up the craft foam. Since the shape of my shortswords makes no sense though, it was a bit harder for me to work out. Non linear brain and all that jazz.
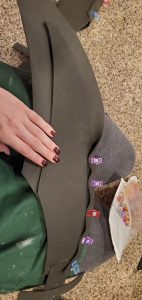
So to start I traced around my blade with a bit of a margin to act as the back portion of the scabbard. My initial  thought process was that I’d be able to do a fold around, completely forgetting the fact that I would have to work around a middle that is larger than either of the ends. Instead I ended up using a sandwiching technique. To get the shape I needed that would allow the sword to be taken in and out easily I cut the top at an angle so that it would be wrapping at both the highest point and the widest point. Additionally I added a strap that goes around the hilt so that it would be harder for them to fall out even with the uneven shape of the scabbard!
 To sandwich them together to see where the glue would be going I wrapped the top piece around the sword and used sewing clips to help secure the foam while I was doing any final cutting that would need to happen on the top piece. After the shape was determined I would take the clips off one or two at a time while I hot glued the top portion to the back. This is also where I took the time to add the loops that would go around the back of my belt to help attack the scabbards to the system. I made sure to add velcro to the back of them so that, much like the clips on my dagger holster, I could take them off easily when doing
  something like sitting.
After everything is glued together and I’ve double checked that they still fit the swords it’s just a matter of getting them painted and sealed! When I go to wear them I will also be using the same yarn that I used on my sword hilts to tie them together, so that they’ll move together when I walk rather than moving separately.
And those are the scabbards! Next week I’ll be talking about additional armor pieces for both Leo and Velvari, so I hope to see you then!


