21 Oct Halloween Remake – Blood Moon Kalista pt. 3
Hello everyone! I hope you’ve all been enjoying your October so far, and that your ready for another Kalista blurb. This week I was petting sitting for some of my newlywed friends and I didn’t want to paint in their apartment, but progress is progress so here’s part one of what became my two part decoration process!

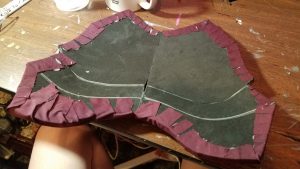
So after all my pieces were cut and the necessary ones were cemented together I had to start the fabric covering process. This is slightly risky business because the edges I put on afterwards will need to be painted gold, but as long as you take your time you can avoid dripping a lot of paint on the fabric you’ve already used to cover your foam. To get the smoothest look I can, first and foremost I iron out the fabric I plan to use. After that I lay down a piece of foam over it and cut an approximate shape around it. From there instead of glueing down the sides in one straight  line, I snip them into maybe 10 to 15 sections and glue down each piece separately so that I can pull them a little more taunt while keeping the corners from getting too bunched up. For the covering of the arm and leg guards I plan on running long strips of fabric through the sewing machine and them weaving them over one another when placing them on the foam – a process I will show in next week’s blog.
 For the gold edging on the belt pieces and back pieces, I’m tracing out the general shape needed onto 5mm craft foam. To give a curved effect that makes it look like I’m not using two seperate pieces for the edges I’ve made sure to cut just enough for the top pieces so I can fold it over and glue it down, allowing for a more seamless look. For the gold edging on the arm and calf guards I will be using bevel cut dowels from TNT Cosplay Supply to achieve the 3D look I need. All of these pieces as
  stated before are being painted after I’ve attached the fabric. So before I ran out of paint it was just a matter of slowly and carefully working my way around all the edges with a smaller brush.
Finally for the belt pieces I am working with a new material I’ve never gotten to use before! I purchased some Cosplay Creative Clay Compound also from TNT Cosplay supply and as I write this post it is currently curing in a silicone candy mold I purchased from Joann. Once they come out of their shells I will be painting them with a pearlescent black paint and using them as the studs that are found on 3 of the 4 belt attachments!
Next week will be our last go about for this cosplay, so I hope you’ve all enjoyed watching it come together so far. Hope to see you next week!


