07 Oct Halloween Remake – Blood Moon Kalista pt. 1
Good morning everyone! Elliott here, with the first of a four part Halloween series for the month of October. As the spooky season begins, we thought it would be a perfect time to do a follow along on a cosplay project that I’ll be bringing with me to our last even of the year in November – GalaxyCon Louisville. And after throwing some ideas back and forth, we decided that a cool costume to make, or in this case remake, would be Blood Moon Kalista. Back in 2015 I made this costume for the first time to be worn with my friend who did Thresh at Ohayocon 2016. Since then I’ve developed my skills a little bit more, so for the Mondays in October this year I’ll be doing a special blog series where I document the remaking process here on the website starting from the mask, and working our way down.
This isn’t a tutorial series, as those aren’t my forte, but I will be putting down relevant information to the construction of certain pieces because they answer some of the questions I’ve been asked at our booths in the past! Other than that, this is just a follow along documentation for entertainment, and I hope you enjoy!
First thing’s first – we need supplies. All the armor in this costume is built with a mixture of 5 and 10mm craft foam purchased from  Joann, as well as a couple of specialty foam items that we’ll discuss in a later post. Some pieces are painted using acrylic paints, and others are covered using quilt cotton fabrics. Pieces were constructed using contact cement or hot glue, and sealed with Kwik Seal, Modge Podge, and Flex Seal! Now that that’s out of the way, let’s actually start breaking down the costume.
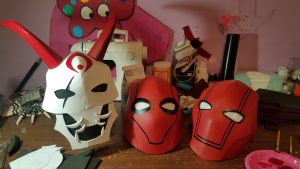
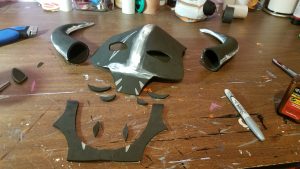
 For the first post I wanted to do Kalista’s mask, because I knew I would be using one of my favorite patterns as a starting point, and because I’ve been asked about it so often. So, for the top half of her skull I used a modified version of Sean Xieng’s Red Hood helmet pattern. If you’ve seen our booth at conventions before, you may have noticed that we usually keep one of my Red Hood helmets on our mannequin for the weekend for the fun of it. Well this is the person who taught me to make it! He has an amazing channel full of tutorials on foam armor and you can find his Red Hood helmet tutorial here, and well as the template I purchased from him here. For my Kalista mask, I used the front piece of his pattern, but stopped it just an inch or so below the eyeline, and rounded out the corners at the top. For the bottom half of the face, I free handed a jaw piece, flipped and copied it, and then adjusted the width slightly by just adding a little rectangle in between them. The horns were originally drawn on some grid paper before being scanned and cleaned up in FireAlpaca. After the pieces were cut from 5mm foam and pieced together using contact cement, I used Kwik Seal to smooth out some of the seams, 2 layers of modge podge as a protective base, and then a layer of Flex Seal to seal and strengthen the foam.
Once the flex seal is dry I work with a few layers of acrylic paint to cover the mask. The symbol on top of her head is free-handed with a pencil before I attempt to paint within the lines (which I have never been good at). To finish it off I find some black fabric to cover the mouth and eye portions. It’s just thin enough to be able to see through it when someone is taking a picture, but I definitely would have to lift it up to be able to see when walking around. To be able to attach it to my wip I will be attaching alligator clips to the cheek bone portions that that it can just be clipped on and off.
And that’s my mask! Overall I’m a lot happier with this one than I am with the flat one I made out of 2mm craft foam back in 2015. It’s not perfect, but I don’t do this for a living to it doesn’t have to be! I’m just happy to see the improvement in my hobby.
Anyways, I hope you enjoyed our first post of October! Next week I’ll be talking through the chest armor and bracers. Hope to see you there!
– Elliott


